Friday, November 7, 2014

Circular Logging and Mailbox Database Copies

In the transaction logging mechanism used by Exchange, each database transaction is written first to a log file and then to the database file.  When a log file reaches a certain size (1 MB in Exchange 2010), it's renamed with the next generation sequence number, and a new log file is created. Over time, this results in a set of log files known as the log stream. If the Exchange Information Store or Windows stops unexpectedly, the log stream is used to recover the transactions by replaying the data from the log files into the database.

Circular logging is a feature of the Joint Engine Technology (JET) database used by all versions of Exchange Server that can be enabled or disabled by an administrator.  When enabled, circular logging allows Exchange to overwrite transaction log files after the data contained in the log files is committed to the database.  By enabling it, you can reduce storage space requirements. However, without a complete set of transaction log files, you won't be able to recover any data more recent than the last full backup.  In Exchange Server 5.5 and earlier, circular logging was enabled by default, and starting with Exchange 2000 Server and continuing to Exchange 2010, it is disabled by default.

In Exchange Server 2007, we introduced continuous replication, and a companion feature that came to be known as continuous replication circular logging (CRCL).  CRCL is different from JET circular logging.  JET circular logging is performed by Information Store, and CRCL is performed by the Microsoft Exchange Replication Service.

We introduced CRCL because JET circular logging can't really work in a continuous replication environment; it doesn't generate additional log files and instead overwrites the current log file when needed.  In a continuous replication environment, log files are needed for log shipping and replay.  As a result, unlike Jet circular logging, when you enable CRCL, the current log file is not overwritten and closed log files are generated for the log shipping and replay process.

Specifically, the Microsoft Exchange Replication Service manages CRCL so that log continuity is maintained and logs are not deleted if they are still needed for replication. The Microsoft Exchange Replication Service and the Microsoft Exchange Information Store service communicate by using remote procedure calls (RPCs) regarding which log files can be deleted.

For truncation to occur on highly available (non-lagged) mailbox database copies, the answer must be "Yes" to the following questions:

  • Has the log file been backed up, or is CRCL enabled?
  • Is the log file below the checkpoint?
  • Do the other non-lagged copies of the database agree with deletion?
  • Has the log file been inspected by all lagged copies of the database?

For truncation to occur on lagged database copies, the answer must be "Yes" to the following questions:

  • Is the log file below the checkpoint?
  • Is the log file older than ReplayLagTime + TruncationLagTime?
  • Is the log file deleted on the active copy of the database?

You enable and disable both features the same way; either by using the checkbox on the Maintenance tab of the database Properties dialog that says Enable circular logging, or by using the Set-MailboxDatabase cmdlet with the -CircularLoggingEnabled parameter.  When you enable circular logging for a mailbox database, the type of circular logging you get depends on whether or not the mailbox database is replicated using continuous replication:

  • If the mailbox database is not replicated, it will use JET circular logging.  In this case, enabling or disabling JET circular logging will require a dismount and mount of the database.
  • If the mailbox database is replicated, it will use CRCL.  In this case, enabling or disabling CRCL takes effect dynamically; there is no need to dismount and re-mount the database.

Because of the differences between JET circular logging and CRCL, there is no way to transition a database between JET circular logging and CRCL or vice versa.  As a result, when you add the first passive copy of a database or remove the last passive copy of a database, circular logging (JET or CRCL) must be disabled.  Both of these operations result in a transition between a non-replicated database and a replicated database or vice versa:

  • If you have circular logging enabled for a non-replicated database and you add your first passive copy, Exchange will block that action to prevent switching from JET CL to CRCL.  This behavior is there because we need to prevent logs from being truncated while the new copy seed starts.  The newly added passive copy would not seed correctly if required logs were removed.
  • Same thing (sort of ) for remove.  When you try to remove the last passive copy, that would result in a transition from CRCL to CL, and we block that because that transition would require a dismounting and re-mounting of the active copy of the database.

Where it gets tricky is that in both cases where we block an operation because circular logging is enabled, the error message returned to the administrator is not accurate.  It says:

Database "{0}" has circular logging enabled. It is not possible to add or remove database copies while circular logging is enabled. Please disable circular logging before adding or removing mailbox database copies.

In addition, a couple of topics on TechNet also repeated this requirement.

It is actually only when you add the second copy of a database (e.g., add the first passive copy), or when you are trying to remove the last passive copy of a database that we block and display this error message.  If you are adding a third or subsequent passive copy, circular logging can remain enabled because adding the copy doesn't require a transition between the two types of circular logging.  Similarly, if you are removing any passive copy except for the last passive copy of a database, circular logging can remain enabled.

The TechNet topics have been updated to reflect this, and those updates will be published with our next document refresh.  And I will be updating the string in Exchange 2010 Service Pack 2 to clarify this, as well.

Thank you Scott, Its really good artical about JET Circular & CRCL logging 

I have copied this article from below site, I am using this Blog for my reference.

http://blogs.technet.com/b/scottschnoll/archive/2011/06/27/circular-logging-and-mailbox-database-copies.aspx

Friday, November 8, 2013

Manage Junk Filter Configuration from Exchange Powershell

Recently one user had issue on Junk filter, He was  blocked some domains from Junk filter in outlook but emails are delivering to his inbox. I got confused and took remote and checked the user junk filter configuration all seems to be fine.

Thanks to Google.

I have found Microsoft Technet article and came to know that Junk filter can be managed by EMS

http://technet.microsoft.com/en-us/library/dd979780(v=exchg.141).aspx

I have checked the Junk filter for that user and the user was added many domains and email address. I am unable to view all address, again i took help from google and found wonder full article. we can use the below command to view all address on single page.

(Get-MailboxJunkEmailConfiguration myidentity).BlockedSendersAndDomains

Here i don't see the domains and address so i added manually by using the below command

$Temp = Get-MailboxJunkEmailConfiguration "Michele Martin"
$Temp.TrustedSendersAndDomains += "contoso.com","fabrikam.com"
$Temp.BlockedSendersAndDomains += "jane@fourthcoffee.com"
Set-MailboxJunkEmailConfiguration -Identity "Michele Martin" -TrustedSendersAndDomains $Temp.TrustedSendersAndDomains -BlockedSendersAndDomains $Temp.BlockedSendersAndDomains

Confirmed with user now the Junk filter is working fine

Thursday, July 11, 2013

Specify a Spam Quarantine Mailbox

You can use the Shell to specify a spam quarantine mailbox for content filtering. If the spam confidence level (SCL) quarantine threshold is enabled, all messages that are quarantined are wrapped as non-delivery reports (NDR) and are sent to the SMTP address that you specify as the spam quarantine mailbox. You can then review quarantined messages and, as appropriate, release them to their intended recipients by using the Send Again feature in Microsoft Office Outlook. For more information, see Release Quarantined Messages from the Spam Quarantine Mailbox.

Looking for other management tasks related to anti-spam and antivirus features? Check out Managing Anti-Spam and Antivirus Features.

CautionCaution:
By the nature of the feature, the person responsible for the spam quarantine mailbox can view potentially private and sensitive messages, and then send mail on behalf of anybody in the Exchange organization.

You need to be assigned permissions before you can perform this procedure. To see what permissions you need, see the "Anti-spam features" entry in the Transport Permissions topic.

noteNote:
You can't use the EMC to specify a spam quarantine mailbox.

Specify a spam quarantine mailbox by using the following command syntax.

Set-ContentFilterConfig -QuarantineMailbox <SmtpAddress>  

This example sends all messages that exceed the spam quarantine to spamQ@contoso.com.

Set-ContentFilterConfig -QuarantineMailbox spamQ@contoso.com  

For detailed syntax and parameter information, see Set-ContentFilterConfig.


The above content copied from Microsoft Technet Artical, This is for my personal reference

http://technet.microsoft.com/en-us/library/bb123746(v=exchg.141).aspx

Manage Anti-Spam Agent Log Output

You can configure the EdgeTransport.exe.config file to manage the anti-spam agent log files. By default, Microsoft Exchange Server 2010 logs all anti-spam agent activity in the %programfiles%\Microsoft\Exchange Server\V14\TransportRoles\Logs\AgentLog directory. To filter the anti-spam agent logs, use the Get-AgentLog cmdlet. For more information, seeGet-AgentLog.

The default configuration of the agent log files are as follows:

  • Maximum size of the agent log directory: 250 megabytes (MB)
  • Maximum size of a single agent log file: 10 MB
  • Maximum age of log files: 30 days

Looking for other management tasks related to managing anti-spam and antivirus features? Check out Managing Anti-Spam and Antivirus Features.

All modifications of configuration options for managing agent log output must be made in the EdgeTransport.exe.config file that's located in the %programfiles%\Microsoft\Exchange Server\V14\Bin directory. The EdgeTransport.exe.config file is an XML application configuration file that's associated with the Microsoft Exchange Transport service. Changes that are saved to the EdgeTransport.exe.config file are applied after the Microsoft Exchange Transport service is restarted.

You can add new configuration options or modify existing configuration options in the <appSettings> section.

Agent log output is managed by various keys in the EdgeTransport.exe.config file. By default, only the AgentLogEnabled key is present in the EdgeTransport.exe.config file. You must add all other keys. The following table explains each key in more detail.


KeyValue type Description

AgentLogEnabled

System.Boolean

Valid values for this key are true or false. The default value is true.

AgentLogMaxDirectorySize

System.Int32

The value of this key specifies the maximum size, in bytes, of the AgentLog directory. When this value is exceeded, the oldest log file in the directory is deleted and a new log file is created.

If this key isn't specified, the default value is 250 MB, or 262144000 bytes, which is determined as follows: 250×1,024×1,024.

AgentLogMaxFileSize

System.Int32

The value of this key specifies the maximum size, in bytes, of each log file in the directory. When a log file reaches the size specified, a new log file is created.

If this key isn't specified, the default is 10 MB, or 10485760 bytes, which is determined as follows: 10×1024×1024.

AgentLogMaxAge

System.TimeSpan

The value of this key specifies the maximum age limit of a specified log file. When a log file exceeds the age limit, it's deleted.

This key is of system type TimeSpan. The value of this key can be represented as a string in the format d.hh:mm:ss.ff where dis days, hh is hours, mm is minutes, ss is seconds, and ff is fractions of a second.

If this key isn't specified, the default value is 30 days, or 30.00:00:00.00.

You need to be assigned permissions before you can perform this procedure. To see what permissions you need, see the "Edge Transport server" entry in the Transport Permissionstopic.

This example adds and configures agent log output keys for the AgentLogEnabled key in the EdgeTransport.exe.config file.

  1. On the Hub Transport server or Edge Transport server on which you want to manage the agent log output, open the EdgeTransport.exe.config in an ASCII text editor such as Notepad. The EdgeTransport.exe.config file is located in the %programfiles%\Microsoft\Exchange Server\V14\Bin directory.
  2. Locate the AgentLogEnabled key. By default, the keys are listed in alphabetical order under <appsettings>.
  3. Paste the following keys under the AgentLogEnabled key.
    <add key="AgentLogMaxDirectorySize" value="system.int32" />  <add key="AgentLogMaxFileSize" value="system.int32" />  <add key="AgentLogMaxAge" value="system.timespan" />  
  4. Verify that the AgentLogEnabled key is set to true, and add values for the other keys.
  5. When you have finished updating the EdgeTransport.exe.config file, save the file and close it.
  6. You must restart the Microsoft Exchange Transport service before the configuration changes will take effect
The above content copied from Microsoft Technet Artical, This is for my personal reference

Excluding Exchange files from File-Level Antivirus Scanning on Exchange 2010

This topic describes the effects of file-level antivirus programs on computers that are running Microsoft Exchange Server 2010. If you implement the recommendations described in this topic, you can help enhance the security and health of your Exchange organization.

File-level scanners are frequently used. However, if they are configured incorrectly, they can cause problems in Exchange 2010. There are two types of file-level scanners:

  • Memory-resident file-level scanning refers to a part of file-level antivirus software that is loaded in memory at all times. It checks all the files that are used on the hard disk and in computer memory.
  • On-demand file-level scanning refers to a part of file-level antivirus software that you can configure to scan files on the hard disk manually or on a schedule. Some versions of antivirus software start the on-demand scan automatically after virus signatures are updated to make sure that all files are scanned with the latest signatures.

The following problems may occur when you use file-level scanners with Exchange 2010:

  • File-level scanners may scan a file when the file is being used or at a scheduled interval. This can cause the scanners to lock or quarantine an Exchange log or a database file while Microsoft Exchange tries to use the file. This behavior may cause a severe failure in Microsoft Exchange and may also cause -1018 errors.
  • File-level scanners don't provide protection against e-mail viruses, such as the Storm Worm. Storm Worm was a backdoor Trojan horse virus that propagated itself through e-mail messages. The worm joined the infected computer to a botnet, where the computer was used to send spam e-mail messages in periodic bursts. Such viruses can affect the performance of the computer and the network that it is attached to.

If you're deploying file-level scanners on Exchange 2010 servers, make sure that the appropriate exclusions, such as directory exclusions, process exclusions, and file name extension exclusions, are in place for both memory-resident and file-level scanning. This section describes directory exclusions, process exclusions, and file name extension exclusions for each server or server role.

You must exclude specific directories for each Exchange server or server role on which you run a file-level antivirus scanner. This section describes the directories that you should exclude from file-level scanning for each server or server role.

Mailbox server role
  • Exchange databases, checkpoint files, and log files. By default, these are located in sub-folders under the %ExchangeInstallPath%\Mailbox folder. You can obtain the directory location by running the following commands in the Exchange Management Shell:
    • To determine the location of a mailbox database, transaction log, and checkpoint file, run the following command: Get-MailboxDatabase -server <servername>| format-list *path*
  • Database content indexes. By default, these are located in the same folder as the database file. 
  • Group Metrics files. By default, these files are located in the %ExchangeInstallPath%\GroupMetrics folder.
  • General log files, such as message tracking and calendar repair log files. By default, these files are located in subfolders under the %ExchangeInstallPath%\TransportRoles\Logs folder and %ExchangeInstallPath%\Logging folder. To determine the log paths being used, run the following command in the Exchange Management Shell: Get-MailboxServer <servername> | format-list *path*
  • The Offline Address Book files. By default, these are located in subfolders under the %ExchangeInstallPath%\ExchangeOAB folder
  • IIS system files in the %SystemRoot%\System32\Inetsrv folder
  • The temporary folder that is used with offline maintenance utilities, such as Eseutil.exe. By default, this folder is the location where the .exe file is run from. However, you can configure where you perform the operation when you run the utility.
  • The Mailbox database temporary folder: %ExchangeInstallPath%\Mailbox\MDBTEMP
  • Any Exchange-aware antivirus program folders
Mailbox server that is a member of a Database Availability Group

All the items listed in the Mailbox server role list and in the %Winnt%\Cluster folder.

Witness server
  • The witness directory files. These are located on another server in the environment, typically a Hub Transport server. By default, these files are located in \\%SystemDrive%:\DAGFileShareWitnesses\<DAGFQDN> and default share (<DAGFQDN>) on that server. For more information about a database availability group (DAG) and witness servers, see Managing Database Availability Groups.
Hub Transport server role
  • General log files, for example, message tracking and connectivity logs. By default, these files are located in subfolders under the %ExchangeInstallPath%\TransportRoles\Logs folder. To determine the log paths being used, run the following command in the Exchange Management Shell: Get-TransportServer <servername>| format-list *logpath*,*tracingpath*
  • Pickup and Replay message directory folders. By default, these folders are located under the %ExchangeInstallPath%\TransportRoles folder. To determine the paths being used, run the following command in the Exchange Management Shell: Get-TransportServer <servername>| fl *dir*path*
  • The transport server role queue database, checkpoint, and log files. By default, these are located in the %ExchangeInstallPath%\TransportRoles\Data\Queue folder. For more information, see Managing Transport Queues.
  • The transport server role Sender Reputation database, checkpoint, and log files. By default, these are located in the %ExchangeInstallPath%\TransportRoles\Data\SenderReputation folder.
  • The transport server role IP filter database, checkpoint, and log files. By default, these are located in the %ExchangeInstallPath%\TransportRoles\Data\IpFilter folder.
  • The temporary folders that are used to perform conversions:
    • By default, content conversions are performed in the Exchange server's TMP folder.
    • By default, OLE conversions are performed in %ExchangeInstallPath%\Working\OleConvertor folder.
  • Any Exchange-aware antivirus program folders
Edge Transport server role
  • The Active Directory Lightweight Directory Service database (AD LDS) and log files. By default, these are located in the %ExchangeInstallPath%\TransportRoles\Data\Adam folder. For more information about AD LDS database files, see Modify AD LDS Configuration.
  • General log files, for example message tracking. By default, these files are located in subfolders under the %ExchangeInstallPath%\TransportRoles\Logs folder. To determine the log paths being used, run the following command in the Exchange Management Shell: Get-TransportServer <servername> | format-list *logpath*,*tracingpath*
  • The Pickup and Replay message folders. By default, these are located under the %ExchangeInstallPath%\TransportRoles folder. To determine the log paths being used, run the following command in the Exchange Management Shell: Get-TransportServer <servername>| format-list *dir*path*
  • The transport server role queue database, checkpoint, and log files. By default, these are located in the %ExchangeInstallPath%\TransportRoles\Data\Queue folder. For more information about transport server queues, see Managing Transport Queues.
  • The transport server role Sender Reputation database, checkpoint, and log files. By default, these are located in the %ExchangeInstallPath%\TransportRoles\Data\SenderReputation folder
  • The transport server role IP filter database, checkpoint, and log files. By default, these are located in the %ExchangeInstallPath%\TransportRoles\Data\IpFilter folder
  • The temporary folders that are used to perform conversions:
    • By default, content conversions are performed in the server's TMP folder.
    • By default, OLE conversions are performed in %ExchangeInstallPath%\Working\OleConvertor folder.
  • Any Exchange-aware antivirus program folders
Client Access server role
  • For servers using Internet Information Services (IIS) 7.0, the compression folder that is used with Microsoft Outlook Web App. By default, the compression folder for IIS 7.0 is located at %SystemDrive%\inetpub\temp\IIS Temporary Compressed Files.
  • For servers using IIS 6.0, the compression folder that is used with Microsoft Outlook Web App. By default, the compression folder for IIS 6.0 is located at %systemroot%\IIS Temporary Compressed Files. For more information about possible errors resulting from scanning the IIS compression folder, see Microsoft Knowledge Base article 817442, A 0-byte file may be returned when compression is enabled on a server that is running IIS.
  • IIS system files in the %SystemRoot%\System32\Inetsrv folder
  • Inetpub\logs\logfiles\w3svc
  • The Internet-related files that are stored in the sub-folders of the %ExchangeInstallPath%\ClientAccess folder
  • For servers that have protocol logging enabled for POP3 or IMAP4, the following folders:
    • POP3 folder: %ExchangeInstallPath%\Logging\POP3
    • IMAP4 folder: %ExchangeInstallPath%\Logging\IMAP4
  • The temporary folders that are used to perform conversions:
    • By default, content conversions are performed in the server's TMP folder.
    • By default, OLE conversions are performed in %ExchangeInstallPath%\Working\OleConvertor folder.
Unified Messaging server role
  • The grammar files for different locales, for example en-EN or es-ES. By default, these are stored in the subfolders in the %ExchangeInstallPath%\UnifiedMessaging\grammars folder.
  • The voice prompts, greetings and informational message files. By default, these are stored in the subfolders in the %ExchangeInstallPath%\UnifiedMessaging\Prompts folder
  • The voicemail files that are temporarily stored in the %ExchangeInstallPath%\UnifiedMessaging\voicemail folder.
  • The temporary files generated by Unified Messaging. By default, these are stored in the %ExchangeInstallPath%\UnifiedMessaging\temp folder.
Microsoft Forefront Protection for Exchange
  • The Forefront installation folder. By default, this is %Program Files (x86)%\Microsoft Forefront Protection for Exchange Server\.
  • Any archived messages. By default, these are stored in the %Program Files (x86)%\Microsoft Forefront Protection for Exchange Server\Data\Archive folder.
  • Any quarantined files. By default, these are stored in the %Program Files (x86)%\Microsoft Forefront Protection for Exchange Server\Data\Quarantine folder.
  • The antivirus engine files. By default, these are stored in the subfolders of %Program Files (x86)%\Microsoft Forefront Protection for Exchange Server\Data\Engines\x86 folder or the %Program Files (x86)%\Microsoft Forefront Protection for Exchange Server\Data\Engines\amd64 folder.
  • The configuration files. By default, these are stored in the %Program Files (x86)%\Microsoft Forefront Protection for Exchange Server\Data folder.

Many file-level scanners now support the scanning of processes, which can adversely affect Microsoft Exchange if the incorrect processes are scanned. Therefore, you should exclude the following processes from file-level scanners.


Cdb.exe

Microsoft.Exchange.Search.Exsearch.exe

Cidaemon.exe

Microsoft.Exchange.Servicehost.exe

Clussvc.exe

MSExchangeADTopologyService.exe

Dsamain.exe

MSExchangeFDS.exe

Microsoft.Exchange.EdgeCredentialSvc.exe

MSExchangeMailboxAssistants.exe

EdgeTransport.exe

MSExchangeMailboxReplication.exe

ExFBA.exe

MSExchangeMailSubmission.exe

GalGrammarGenerator.exe

MSExchangeRepl.exe

Inetinfo.exe

MSExchangeTransport.exe

Mad.exe

MSExchangeTransportLogSearch.exe

Microsoft.Exchange.AddressBook.Service.exe

MSExchangeThrottling.exe

Microsoft.Exchange.AntispamUpdateSvc.exe

Msftefd.exe

Microsoft.Exchange.ContentFilter.Wrapper.exe

Msftesql.exe

Microsoft.Exchange.EdgeSyncSvc.exe

OleConverter.exe

Microsoft.Exchange.Imap4.exe

Powershell.exe

Microsoft.Exchange.Imap4service.exe

SESWorker.exe

MSExchangeMailboxAssistants.exe

SpeechService.exe

Microsoft.Exchange.Monitoring.exe

Store.exe

Microsoft.Exchange.Pop3.exe

TranscodingService.exe

Microsoft.Exchange.Pop3service.exe

UmService.exe

Microsoft.Exchange.ProtectedServiceHost.exe

UmWorkerProcess.exe

Microsoft.Exchange.RPCClientAccess.Service.exe

W3wp.exe

If you're also deploying Forefront Protection for Exchange Server, exclude the following processes.


Adonavsvc.exe

FscStatsServ.exe

FscController.exe

FscTransportScanner.exe

FscDiag.exe

FscUtility.exe

FscExec.exe

FsEmailPickup.exe

FscImc.exe

FssaClient.exe

FscManualScanner.exe

GetEngineFiles.exe

FscMonitor.exe

PerfmonitorSetup.exe

FscRealtimeScanner.exe

ScanEngineTest.exe

FscStarter.exe

SemSetup.exe

In addition to excluding specific directories and processes, you should exclude the following Exchange-specific file name extensions in case directory exclusions fail or files are moved from their default locations.

Application-related extensions
  • .config
  • .dia
  • .wsb
Database-related extensions


.chk

.jrs

.log

.edb

.jsl

.que

Offline address book-related extensions
  • .lzx
Content Index-related extensions


.ci

.wid

.001

.dir

.000

.002

Unified Messaging-related extensions
  • .cfg
  • .grxml
GroupMetrics
  • .dsc
  • .bin
  • .xml
Forefront Protection for Exchange Server–related extensions


.avc

.dt

.lst

.cab

.fdb

.mdb

.cfg

.fdm

.ppl

.config

.ide

.set

.da1

.key

.v3d

.dat

.klb

.vdb

.def

.kli

.vdm

The file name extensions listed for Forefront Protection for Exchange Server are the signature files from various antivirus directory engines. In most cases, these file name extensions don't change. However, file name extensions may be added in the future as third-party antivirus vendors update their antivirus signature files.


This content copied from Microsoft Technet Artical its only for my personal reference

http://technet.microsoft.com/en-us/library/bb332342(v=exchg.141).aspx

Changing and managing your Office 2010 product keys

Quick version of how to change your Office 2010 key

Via control panel, go to install / remove a program (this called different things in different versions of Windows, but if you have a Technet or MSDN subscription I would pretty much hope you know where this is).

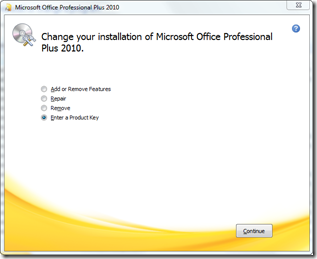
Find the entry for Office 2010 and choose to change the installation (not remove). The very first screen of the install wizard gives you a bunch of options, simply choose the one to enter a product key as shown below:

Office 2010 change installation wizard

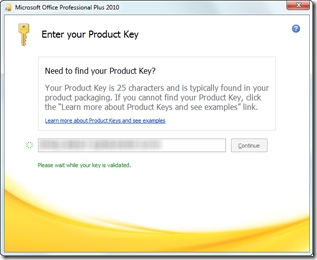
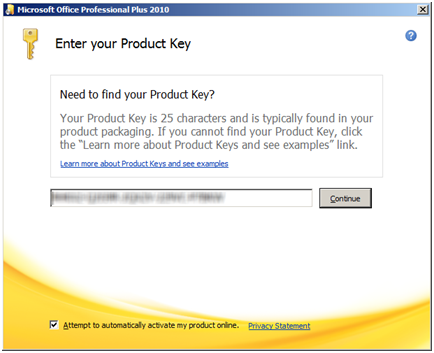
Note when you enter your 25 digit product key, you don't have to worry about CAPS or putting the hyphens in, that gets taken care of for you (just as with previous versions of Office). Also notice that when you put the last character in you get a message saying "Please wait while your key is validated" and the "Continue" button is greyed out and inactive (as seen below).

Office 2010 product key validation

Assuming your key is valid the message disappears and the button is activated so you can carry on. This is much clearer than the previous method for Office 2007 where the last character simply did not appear on screen while it was validating, there was just a mysterious wait and then the character appeared along with a green tick (or not, if it was invalid).

During a normal installation you then go through the various options, but if you are just changing the key that's all you need to do. Incidentally when you do install Office 2010 if you need to keep your previous version (and have a valid licence to do so, ie your Office 2010 is not an upgrade licence which effectively replaces your previous copy).

Using a VB script to change your product key

In the KB article it also lists an alternative method to change your product key using the Office 2010 Client Software License Management Tool – a VBS file which is already on your machine as part of the original install, for which there is an accompanying html file with usage instructions and notes. If you have the 32 bit version on a 64 bit platform the file you need to look at would be here:

%ProgramFiles(x86)%\Microsoft Office\Office14\  (note the usual inclusion of "(x86)" here)

Otherwise: %ProgramFiles%\Microsoft Office\Office14\

The files to look for in here are OSPP.HTM (found easily using windows search, especially on Vista or Windows 7 straight from the Start menu) and OSPP.VBS (as far as I know that stands for Office Software Protection Platform).

So, the simple usage for switching to a new product key and then re-activating your copy of Office is as described in the KB article (the only differences here being the (x86) in the path in the latter two commands):

If you are using the x86 version of Office Professional Plus 2010 on an x64 version of Windows operating system, follow these steps:

  1. At the command prompt, run the following command:
    cscript "%ProgramFiles(x86)%\Microsoft Office\Office14\ospp.vbs" /inpkey:<Product_Key>
    Note: <Product_Key> represents the product key that you want to install.
  2. Run the following command:
    cscript "%ProgramFiles(x86)%\Microsoft Office\Office14\ospp.vbs" /act

In other situations, follow these steps:

  1. At the command prompt, run the following command:
    cscript "%ProgramFiles%\Microsoft Office\Office14\ospp.vbs" /inpkey:<Product_Key>
  2. Run the following command:
    cscript "%ProgramFiles%\Microsoft Office\Office14\ospp.vbs" /act

Finding out which key is installed already

Another useful switch you can use is /dstatus which will report which edition is currently installed and licensed and the last 5 characters of the product key. This can be useful if you are having activation problems and need to make sure you have not used the same key twice on different machines in error, or if you are trying to maintain records and have your huge list of licence codes from various purchases and want to know which ones are used where (and perhaps which are not yet used at all). Of course, for large businesses you should be looking at volume licensing and simplifying this a lot, but many medium sized businesses may not be in a position to do that, yet need to control their spending and show they have good records of their software in use.

Notice that you can use the ospp.vbs script to target another machine on the network as well, so you could get licence keys for the Office 2010 installs on all computers by name, and use it to swap the keys on them or get them to reactivate remotely, for example to check the key in use on SomeComputer:

cscript "%ProgramFiles%\Microsoft Office\Office14\ospp.vbs" /dstatus SomeComputer

Why else would I need to change a key?

Maybe you installed Office 2010 on more than one computer and then realised you had accidentally put the same key into more than one machine (which would prevent activation from working properly), and you now need to put the right code in. Of course, you might also need to change the product key to stay properly within the terms of the Technet licence since that only allows you to evaluate the product, not use it long term to actually run your business. You can either buy a regular licence to get a code, or if you bought and installed Office 2007 between March 5th and September 30th 2010 you can go to the Office Technology Guarantee site and get a product key for an equivalent version of Office 2010. Note you can only get a free upgrade for 25 Office products which should only matter at all to small businesses not already buying into volume licensing with software assurance, and even then it's still something for nothing.

What about upgrading from different editions of the suites?

Since there is no "Ultimate" edition of Office 2010, upgrades from Office 2007 Ultimate will be to Office 2010 Professional. In all other cases the version you get is the same or a small step up from the 2007 version – most Office 2010 suites now include OneNote for example, so this will be an additional program for free. If you have 2007 programs not included in 2010, the short answer is to make sure you don't uninstall them when you install Office 2010.


---------------------------------------------------------------------------------------------------------------------------------------------


Other Methods to Change the Office 2010 Product Key


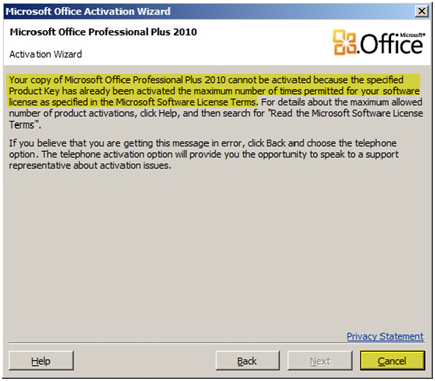
ssue: You go to activate Microsoft Office 2010 and you receive a message stating, "Your copy of Microsoft Office Professional Plus 2010 cannot be activated because the specified Product Key has already been activated the maximum number of times permitted for your software license as specified in the Microsoft Software License Terms."


The solution is to change the product key to another product key. I will show you three different methods of changing the License Key

Method 1

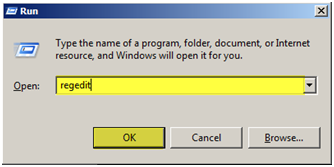
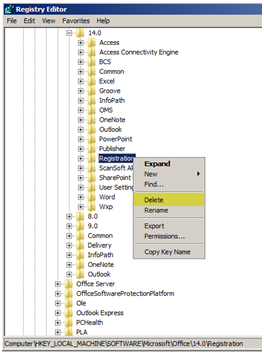
Open "regedit"


Navigate the registry to: HKEY_LOCAL_MACHINE\SOFTWARE\Microsoft\Office\14.0\Registration\ and delete the whole "Registration" key located under the "14.0″ key

Right click "Registration"

Select "Delete"


Press "Yes"


Close Regedit, Restart an Office 2010 application. You should be prompted to reenter your License Key


Method 2

Open to Microsoft Word

Press "File"

Press "Help"

Select "Change Product Key" (this option was not here on my installation, I used Method 1)


Method 3

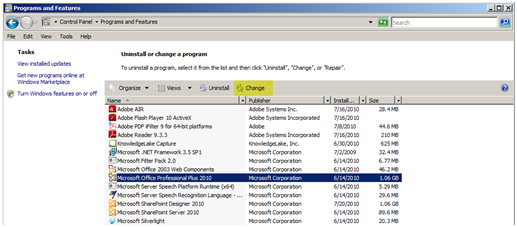
Click on Start Menu > Control Panel > Programs and Features (or Add/Remove Programs, depending on your operating system).

Click on your product, e.g. Microsoft Office Professional Plus 2010

Click "Change" on the top menu.


Select the option to "Enter a Product Key."

Press "Continue"


Changing your Product Key

Once you complete one of the Methods listed above you should be able to change your Product Key

Enter the appropriate product key from the top of this page and click "Continue."


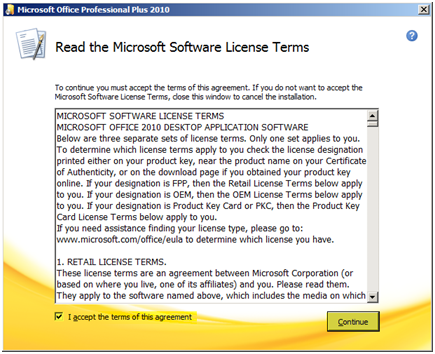
Accept the agreement

Press "Continue"


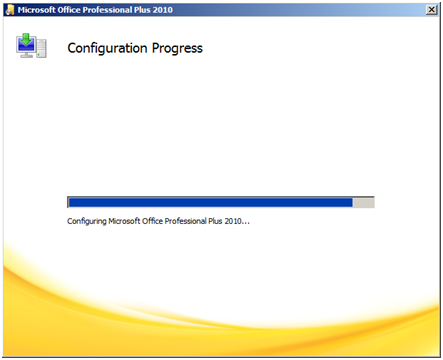
Configuration will occur


Press "Close"


Select "I want to activate the software over the Internet (recommended)"

Press "Next"


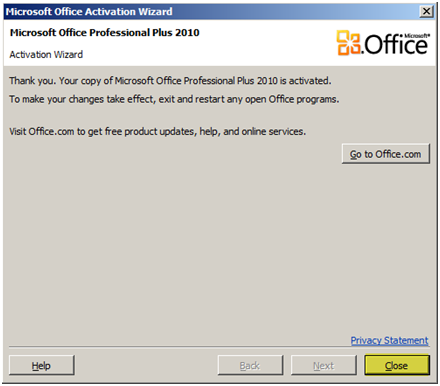
Your product should activate successfully

Press "Close"